Important Information:
This article is deprecated and is no longer updated. As of October 2023, PRTG no longer supports Windows Server 2012 R2. We recommend you use the most recent version of Windows Server..
This article applies as of PRTG 22
Is there a way to monitor SCVMM hosts and virtual machines in PRTG following the removal of the SCVMM Host and SCVMM Virtual Machine sensors, without losing functionality or information?
Monitoring SCVMM hosts and SCVMM virtual machines
The SCVMM Host sensor and the SCVMM Virtual Machine sensor are two sensors that we removed in the context of the PRTG sensor cleanup. You could use these sensors to monitor hosts and virtual machines (VM) managed by a Microsoft System Center Virtual Machine Manager (SCVMM) like Hyper-V, VMware, or XenServer hosts and VMs. As of PRTG 16.1.23, you cannot add these sensors anymore and running SCVMM sensors were removed as of PRTG 16.x.25.
Nevertheless, you can still continue (or start) monitoring your SCVMM. For example, you can use an EXE/Script sensor that runs an according PowerShell (ps1) script.
We provide a custom script for SCVMM monitoring for download and you can additionally use a device template to automatically add SCVMM sensors to an SCVMM device. Follow the steps below to add sensors that monitor SCVMM hosts and SCVMM virtual machines to your PRTG installation.
Using the PowerShell script, you can monitor the following values on a SCVMM host:
- Overall State
- Communication State
- CPU Utilization
- Total Memory
- Available Memory
- Cluster Node Status
- Virtual Server State
- Computer State
- Host Cluster
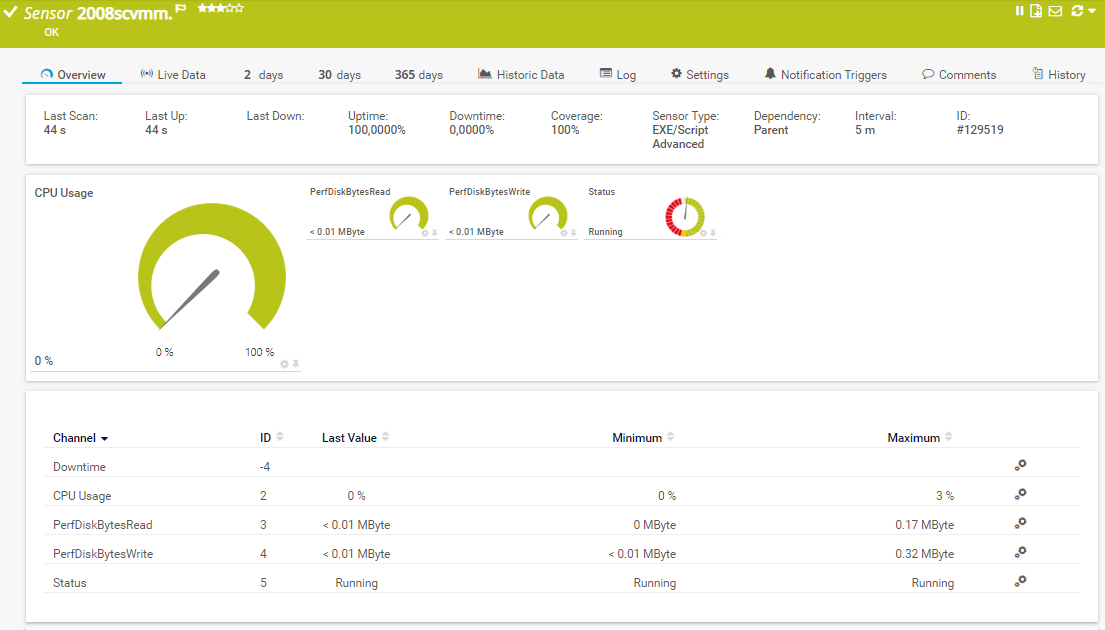
For an SCVMM virtual machine, the custom sensor can show the following values:
- Status
- CPU Usage
- PerfDiskBytesRead
- PerfDiskBytesWrite
Requirements
To use the custom sensors for SCVMM monitoring, you need to fulfill the following requirements. These are the same as for the SCVMM sensors that were available in previous PRTG versions:
- PowerShell 4.0 installed on the probe system (local or remote probe system)
- .NET 4.0 installed on the probe system
- Windows credentials in the settings of the device that represents your SCVMM
- Remote PowerShell 2.0 enabled on the target SCVMM device
- VMM PowerShell Plugin installed on the target SCVMM device (under Windows 2008/2012, it is part of the VMM 2008/2012 Administrator Console)
- Windows Management Framework 1.0 or later installed on the probe system (because the included System.Management.Automation namespace is required by the SCVMM sensors)
- Requirements for Windows Server 2012 compatibility:
- The SCVMM PowerShell module must be in the directory
C:\Program Files\Microsoft System Center 2012\Virtual Machine Manager\bin\psModules\virtualmachinemanager\virtualmachinemanager - Set the execution policy in PowerShell to allow the execution of
Import-Module C:\Program Files\Microsoft System Center 2012\Virtual Machine Manager\bin\psModules\virtualmachinemanager\virtualmachinemanagerUse the command Set-ExecutionPolicy (we recommend RemoteSigned).
- The SCVMM PowerShell module must be in the directory
For more information, see Where can I find more information about PowerShell sensors?
Steps to take
- Download the SCVMM sensor package that contains the PowerShell script, the device template, and the lookup files: PRTG-SCVMM-HyperV.zip
Use the updated script located at GitHub. - Unzip and save the script PRTG-SCVMM-HyperV.ps1 to the \Custom Sensors\EXE subfolder of the PRTG program directory on the probe system from which you want to monitor your SCVMMs.
- Open a PowerShell (32-bit) with admin privileges on this system and execute the following command (and confirm it):
Set-ExecutionPolicy RemoteSigned- Note: Executing the PowerShell script with PowerShell (x86) will not work with the script. The sensor message is UnauthorizedAccess when trying a 64-bit PowerShell.
- Unzip and save the following lookup files to the \lookups\custom subfolder of the PRTG program directory on the PRTG core server.
Note: This step is not necessary if you updated from a PRTG version previous to PRTG 16.1.23.- prtg.standardlookups.hyperv.clusternodestatus.ovl
- prtg.standardlookups.hyperv.communicationstate.ovl
- prtg.standardlookups.hyperv.computerstate.ovl
- prtg.standardlookups.hyperv.hoststatus.ovl
- prtg.standardlookups.hyperv.virtualserverstate.ovl
- prtg.standardlookups.hyperv.vmstatus.ovl
- Add a device to PRTG that represents your SCVMM.
- Provide your Credentials for Windows Systems if the inherited credentials are not sufficient for the SCVMM.
- Add a new HTTP Push Data sensor or HTTP Push Data Advanced sensor to the device, name it any way you like (for example, Template Sensor), and pause it. Write down its sensor ID.
- Create a new EXE/Script sensor and select the PRTG-SCVMM-HyperV.ps1 script.
- Set the timeout to 900 seconds.
- Enter the corresponding parameters. These are explained in the table below.
- Click Create.
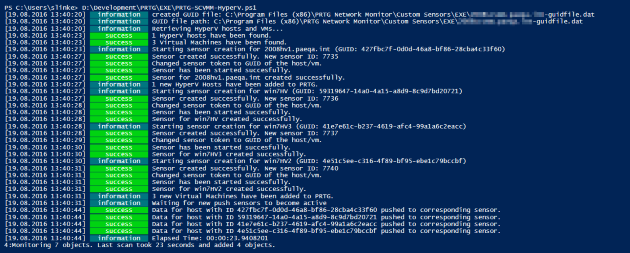
When you directly enter the data in the script, you can also test it on the fly. Initially, it will look like the attached screenshot #1, consequential runs will look like #2. Note that the sensors may not get any data immediately after the first run. This is because the sensors' startup will take some time and the script may push values prior to that.
Detailed output of the sensor when it is initially executed adding new hosts or VMs:
Detailed output of the sensor when executed with an existing GUID file:
Custom SCVMM sensor monitoring a virtual machine:
Parameters
| Parameter | Description |
|---|---|
| prtgHostName | The URL of your PRTG web interface, for example, http://prtg.acme.com or https://prtg.acme.com |
| prtgPort | The port used by your PRTG web interface, for example, 80 or 443 |
| prtgUserName | A user with read/write permissions for the device or a PRTG administrator |
| prtgPassHash | The passhash of the above user |
| prtgPushPort | The push port you configured in the template |
| prtgScvmmDeviceId | The ID of the device that represents your SCVMM server: Recommended value is %deviceid |
| prtgTemplateSensor | The ID of the HTTP Push Data template sensor or the HTTP Push Data Advanced template sensor (not the sensor token, but the PRTG ID) |
| Userdomain | The domain of the user that will be used for Remote PowerShell access: Recommended value is %windowsdomain |
| Username | The username that will be used for Remote PowerShell access: Recommended value is %windowsuser |
| Password | The password of the user that will be used for Remote PowerShell access: Recommended value is %windowspassword |
| Verbose | When this is set, there will be debug messages as script output. This can always be enabled as it does not bother PRTG. |
Version history
| Version | Release notes |
|---|---|
| 1.3 | [Changed] Switch to a HTTP Push sensor-based system. No device templates are needed. This is better for large environments. [Notes] The sensor is a simple EXE/Script sensor now, no longer an EXE/Script Advanced sensor. Device templates are no longer needed, as the sensor automatically creates new sensors for new hosts and VMs with each run. With every run, we only run Get-VMHost and Get-VM once on the SCVMM host, receiving all objects at once, not once for every VM. A GUID file is maintained for every SCVMM host that will prevent sensor duplicates. Performance-wise, this is a lot easier and faster. Three VMs and one host take 2 seconds to scan. There is even more detailed script output to see what the script actually does, receives and evaluates. |
| 1.21 | [Changed] The device template now has a timeout of five minutes for large environments. [Changed] The default VMsensor scanning interval is set to 10 minutes (since there are 10-minute averages). |
| 1.2 | [Improved] Naming conventions of the sensor [Fixed] Auto-discovery is now working with the stable version. |
| 1.1 | [Improved] Documentation [Fixed] Values were not correctly retrieved when multiple VMs were present. [Fixed] Values were not correctly retrieved because of a lookup bug. |
| 1.0 | Initial Release |
Flow chart

Credits
Special thanks to Richard Garner, computerservicecentre.com, for going through countless tests and bugfixing with me and giving ideas for improvement.
Note
Attention This will not work if your PRTG core server uses HTTPS with an unsigned SSL certificate because of PowerShell being picky and only accepting signed certificates.
Disclaimer:
The information in the Paessler Knowledge Base comes without warranty of any kind. Use at your own risk. Before applying any instructions please exercise proper system administrator housekeeping. You must make sure that a proper backup of all your data is available.
