
This article applies as of PRTG 26.3.122
Grant WMI permissions to non-admin users
By default, only members of the Administrators group have permission to access Windows Management Instrumentation (WMI) namespaces. To use a Windows account or a security group that has fewer privileges than an administrator account for WMI monitoring, you must configure additional permissions on each target system. This article describes the required steps for both member servers and domain controllers, and it shows how to deploy the permissions at scale with Group Policy.
The approach follows the principle of least privilege. The monitoring account needs exactly three grants on each target system. It does not need membership in the Administrators group, the Domain Admins group, or the Distributed COM Users group, and it does not require Distributed Component Object Model (DCOM) hardening.
Which permissions do my sensors need?
Grant only the permissions that your sensors actually use. The following table shows the three possible grants and when each one is required.
Grant | Required for | Where you set it |
|---|---|---|
Membership in the Remote Management Users group | All sensors on probes that use WSMan for WMI connections. This grant allows the account to open a WSMan connection. See below for a complete list of which sensors can use WSMan exclusively. | Local Remote Management Users group (member servers) or the built-in domain-local group (domain controllers) |
Enable Account and Remote Enable on the Root\CIMV2 namespace | All sensors on probes that use WSMan for WMI connections. This grant allows the account to read instrumentation data. See below for a complete list of which sensors can use WSMan exclusively. | WMI Control on each target system |
Execute Methods on the Root\CIMV2 namespace | Only sensors that call a WMI method. | WMI Control on each target system |
Read access to the Service Control Manager | Only sensors that query the state of Windows services (for example, the WMI Service and WMI Service v2 sensor). | Service Control Manager security descriptor on each target system |
List of WMI sensors that use WSMan exclusively
While all WMI sensors can be added on probes that use WSMan for WMI connections, newer WMI sensors (usually marked as v2) explicitly require that the parent probe uses WSMan as they do not work with DCOM, which is the legacy approach for WMI connections.
Optional related grants
Some sensors need additional permissions:
Sensor type | Additional grant |
|---|---|
Sensors that read performance counters | Membership in the local Performance Monitor Users group |
Sensors that read the security event log | The Manage auditing and security log user right (grant this right sparingly) |
Sensors that query other namespaces | Access to the relevant namespace, for example Root\MicrosoftDNS for DNS or Root\MSCluster for clustering |
Solution
Choose the Windows account that you want to use for WMI monitoring or create a new one. We recommend that you use a dedicated, low-privilege account and that you deny both interactive logon and Remote Desktop logon for this account, especially on domain controllers.
When you have the account, the solution consists of the following steps:
Add the account to the Remote Management Users group on the target system to allow WSMan connections. The steps differ for member servers and domain controllers. For more details on this group, see the Microsoft documentation: Remote Management Users.
Grant the account access to the Root\CIMV2 WMI namespace.
Optional: Grant the account read access to the Service Control Manager. Complete this step only if you monitor the state of Windows services.
Note: If you want to grant the necessary permissions to a security group instead of an individual user account, the steps are the same. We recommend that you use a dedicated security group. You then grant every permission to the group and add the monitoring account to the group. This approach keeps every permission that you set on each system pointed at one stable identity.
Step 1: Add the Windows account to the Remote Management Users group
Membership in the Remote Management Users group allows the account to open a WSMan connection to the target system. Choose the procedure for your system type.
A.) Member servers
To add the account through the interface:
- On the target system, open Computer Management.
- Go to Local Users and Groups | Groups.
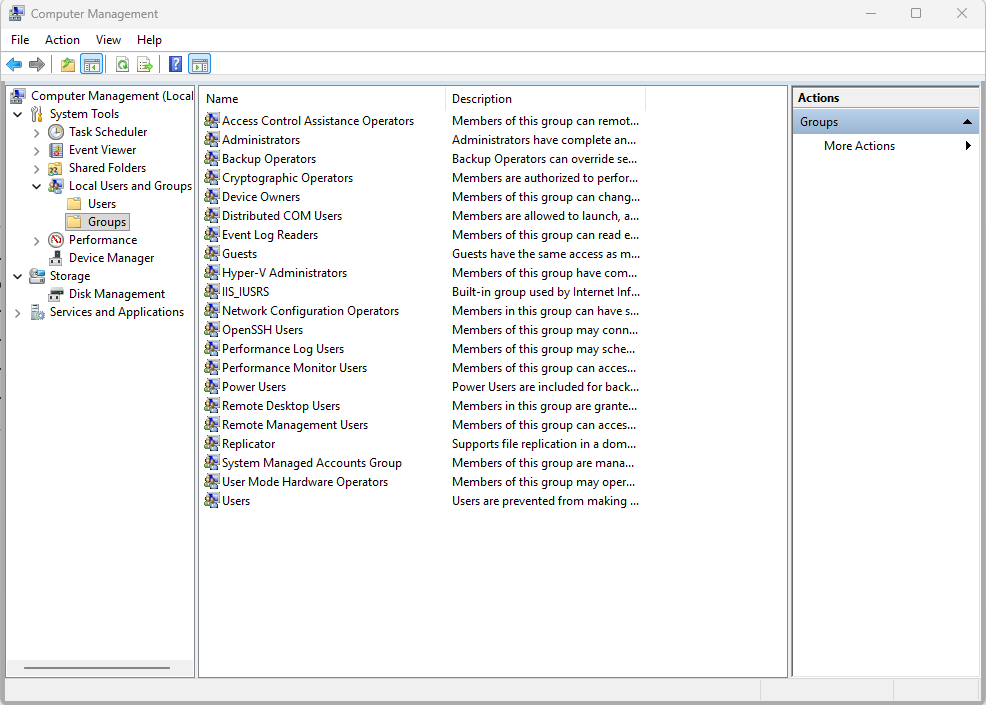
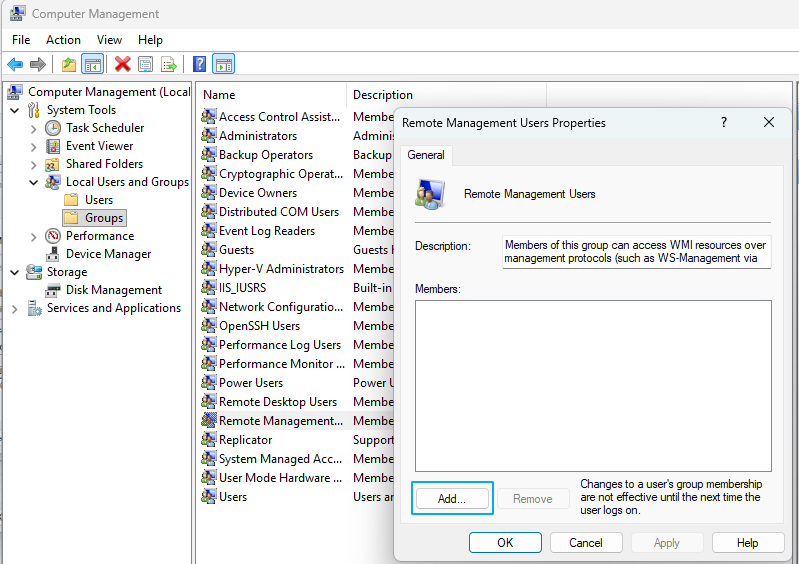
- Select Remote Management Users.
- Click Add.
- Enter the account or security group that you want to use for WMI monitoring. Enter the name directly as an object name, then select Check Names. To search for the object name, select Advanced.
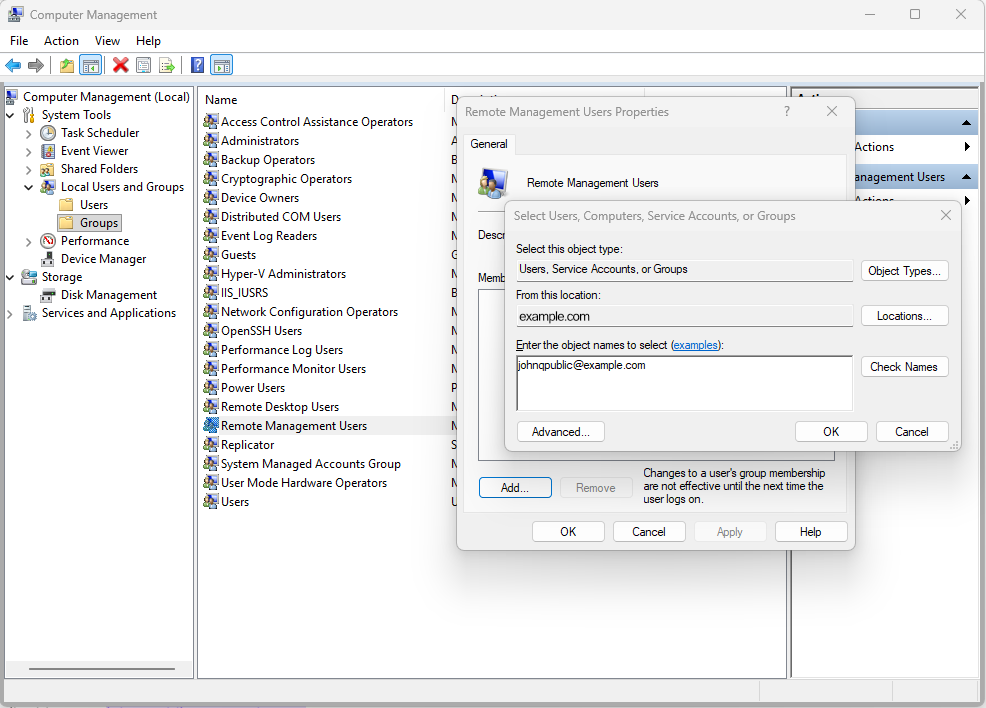
- Click OK to save your changes.
To add the account with Windows PowerShell, run the following command on the target system:
Add-LocalGroupMember -Group "Remote Management Users" -Member "DOMAIN\AD-Remote-WMI-Access"To add the account to many member servers at once, use Group Policy. Go to Computer Configuration | Preferences | Control Panel Settings | Local Users and Groups, create a local group item for the built-in Remote Management Users group, and select the Update action so that you do not overwrite existing members.
B.) Domain controllers
Domain controllers do not have a local account database, so the Add-LocalGroupMember command and the local users and groups snap-in do not work. On a domain controller, Remote Management Users is a built-in domain-local group that you manage in Active Directory Users and Computers under the Builtin container.
To add the account with Windows PowerShell, run the following command with the Active Directory module:
Add-ADGroupMember -Identity "Remote Management Users" -Members "AD-Remote-WMI-Access"Note: A change to this group applies to every domain controller in the domain. You cannot limit the change to a single domain controller. Treat access to domain controller instrumentation as a sensitive grant, and review the group membership periodically.
Step 2: Grant access to the WMI namespace
All WMI sensors in PRTG query classes under the Root\CIMV2 namespace. You must grant access to this namespace to the account or security group that you want to use for WMI monitoring.
To grant access through the interface:
On the target system, open Computer Management.
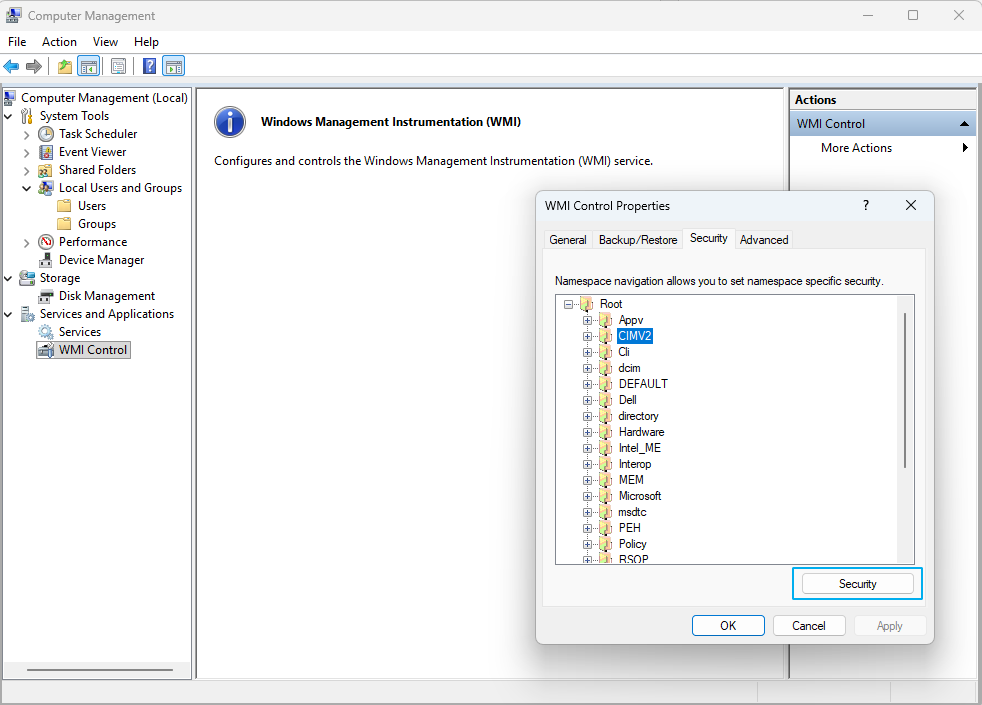
Go to Services and Applications | WMI Control.
Right-click WMI Control, then select Properties.
In the WMI Control Properties window, select the Security tab.
Expand Root, then select CIMV2.
Click Security.
Note: Do not grant Write permissions or full provider access. Read-only monitoring never requires these permissions.
All WMI sensors in PRTG query classes under the Root\CIMV2 namespace. You must grant access to this namespace to the account or security group that you want to use for WMI monitoring.Select Add, then add the account or security group that you want to use for WMI monitoring.
Select the account that you added, then select Advanced.
Select the account again, then select Edit.
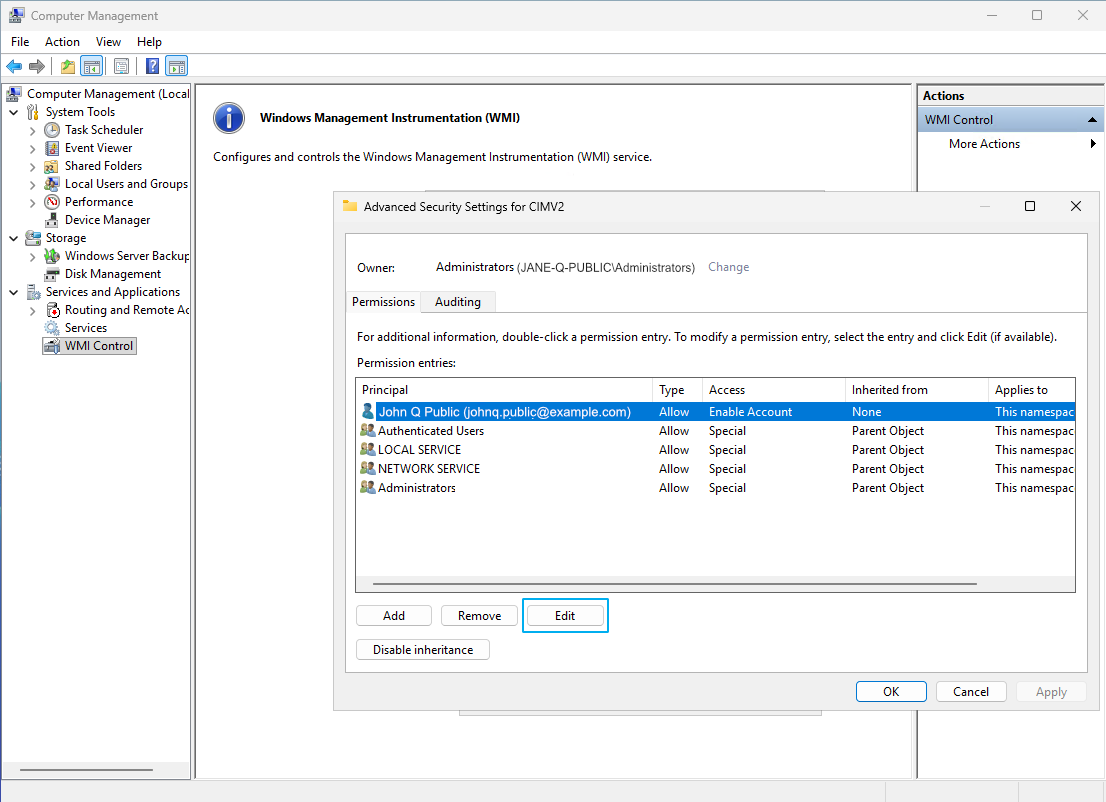
Set the following:
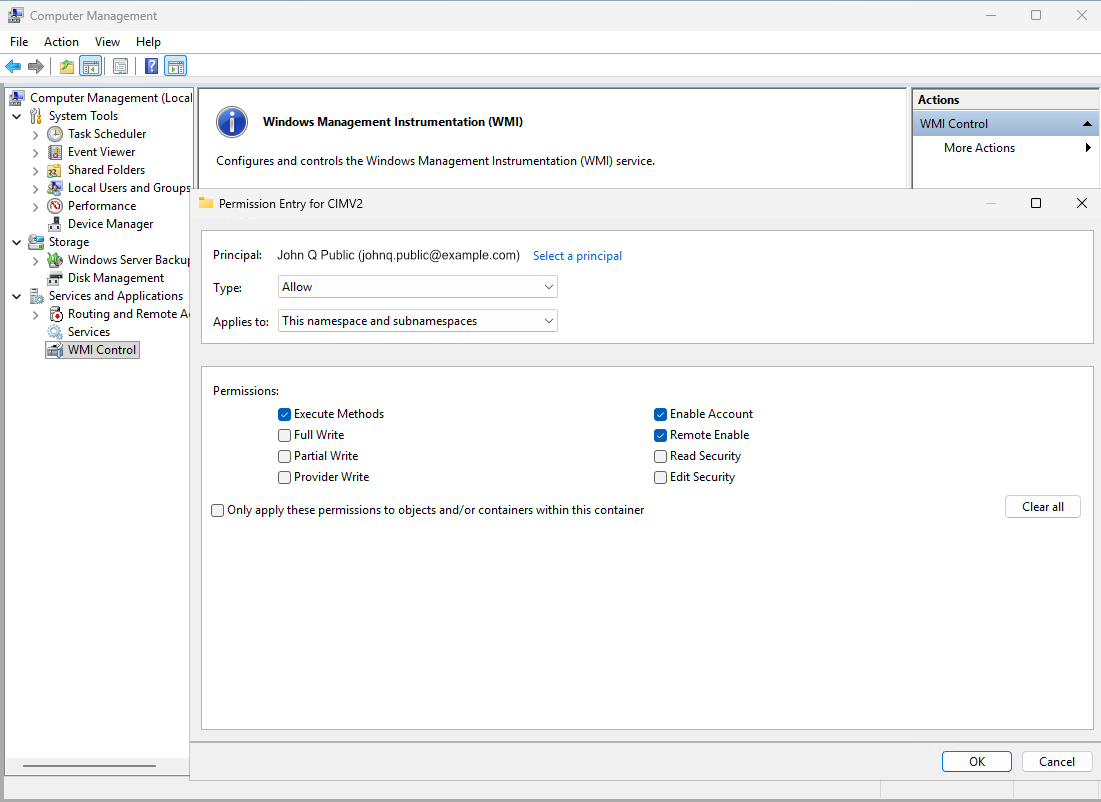
In Type, select Allow.
In Applies to, select This namespace and subnamespaces.
In Permissions, select Enable Account and Remote Enable. If any of your sensors call a WMI method, also select Execute Methods.
- Select OK to close all open windows, then select Apply in WMI Control Properties.
Notes:
- Do not grant Write permissions or full provider access. Read-only monitoring never requires these permissions.
- By default, you grant access to the Root\CIMV2 namespace. Some data lives in other namespaces, for example Root\MicrosoftDNS for DNS or Root\MSCluster for clustering. To grant access to another namespace, follow the steps above, but select that namespace instead of CIMV2.
Step 3: Grant read access to the Service Control Manager
Complete this step only if you monitor the state of Windows services, for example with the WMI Service sensor. Queries for the Win32_Service class use the Service Control Manager. By default, the Service Control Manager denies remote access to accounts that are not administrators.
To grant read access to the Service Control Manager, append a read entry to the current security descriptor. Read the current descriptor first, because it varies by operating system build.
On the target system, read the current security descriptor:
sc.exe sdshow SCMANAGER
Get the security identifier (SID) of the account:
(New-Object System.Security.Principal.NTAccount("DOMAIN\inframonitor")).Translate([System.Security.Principal.SecurityIdentifier]).ValueAppend a read entry for the SID before the S: (SACL) portion of the descriptor:
sc.exe sdset SCMANAGER "<existing-DACL>(A;;CCLCRPRC;;;<SID>)<existing-SACL>"
The entry (A;;CCLCRPRC;;;<SID>) grants the account the rights to connect, enumerate, query status, and read control. These rights are enough to read the state of a service. They do not allow the account to start or stop a service.
You can now enter the account in the Credentials for Windows Systems settings in PRTG and use it for WMI monitoring.
Step 4: Grant membership in the Performance Monitor Users group
Complete this step only if you use sensors that read Windows performance counters. To read performance counters remotely, the account must be a member of the Performance Monitor Users group. This is a standard Windows group. Add the account to it the same way that you add the account to the Remote Management Users group in Step 1.
Step 5: Grant the Manage auditing and security log user right
Complete this step only if you use sensors that read the security event log. To read the security log, the account needs the Manage auditing and security log user right. Grant this right sparingly, because it also allows the account to clear the security log.
A.) Single system
- On the target system, open Local Security Policy.
- Go to Local Policies | User Rights Assignment.
- Select Manage auditing and security log.
- Click Add User or Group, then add the account or security group that you want to use for WMI monitoring.
- Click OK to save your changes.
A.) Multiple systems
To grant the user right to many systems at once, use a Group Policy object. Go to Computer Configuration | Policies | Windows Settings | Security Settings | Local Policies | User Rights Assignment, then configure Manage auditing and security log.
More
PRTG Manual: Probe Settings (section Credentials for Windows Systems)
